5 minutes
Lab — Static Routing and EIGRP
In this lab, the goal was to practice some basic routing configurations. Going through the NetworkChuck Summer of CCNA course, this is the section we are currently up to.
A Little Bit on Routing
Routers will not route to networks they do not know about. They are clever devices in some ways, but not that clever. There are a few different ways to get routers to know about networks. Firstly, any network directly connected to the router (i.e. plugged into an interface) will be available, provided the IP address has been set and the interface is up/up.
Next, there is static routing. This is where the administrator will manually add routes to the device to be used in the routing table. It is a straightforward process to add static routes, but there is a catch that is easy to get tripped up on. If you put in a static route, that allows traffic to flow one way through the other router out to the desired network. However, it does not help with return traffic, because the other router will need a static route to know how to get the return traffic back through the original router. We must always remember that if we open a path for traffic to flow out, we also need to open the return path for traffic to come back.
The last type of routing is dynamic. This is the magic way of setting up routes. If you come from starting with static routes, when you first see dynamic routing in action, it is a beautiful thing to see. The very basic premise of dynamic routing is that you do not need to tell the routers manually about how to reach other networks; you enable the protocol, add a little bit of configuration, and the routers discover each other and share their networks. There are various protocols that can be used for dynamic routing, each with their own benefits and drawbacks, but that is for another post.
The Lab
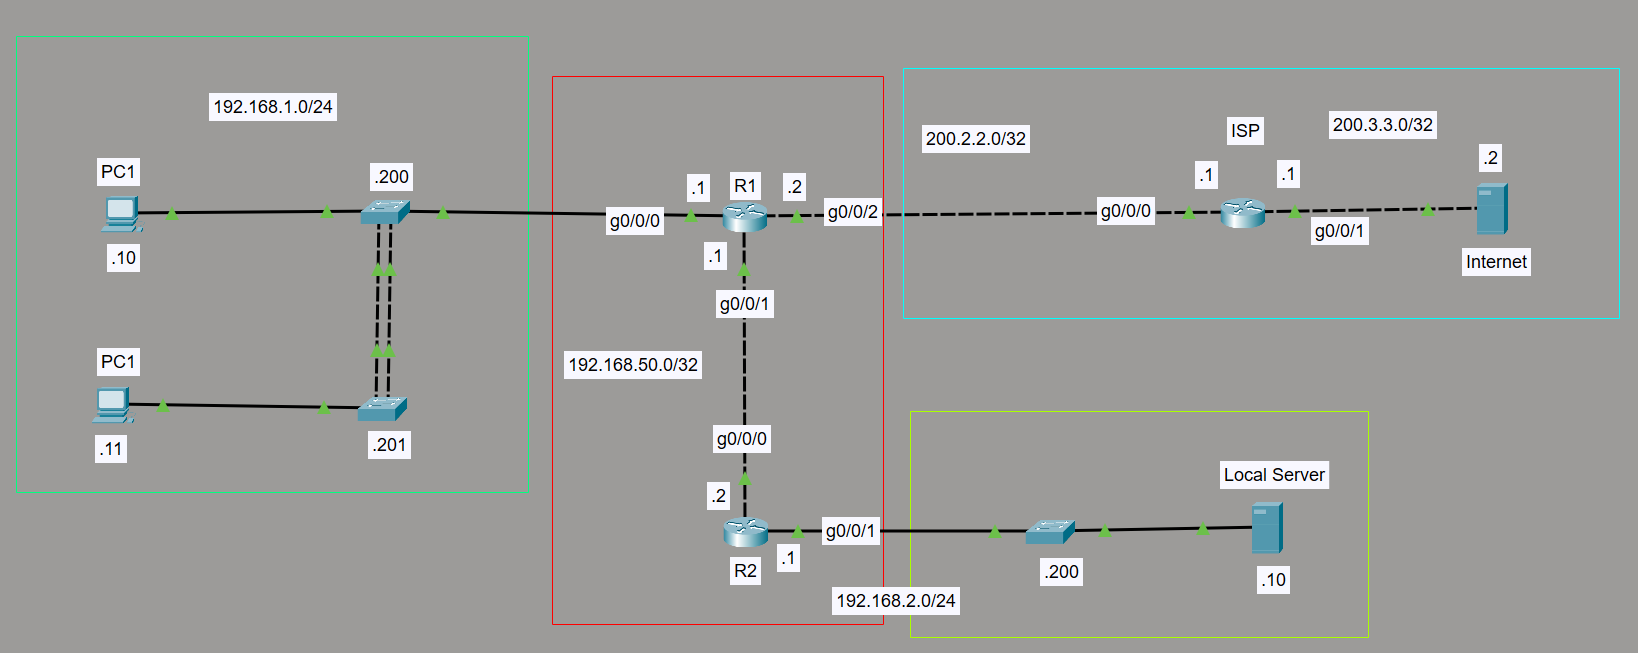
So in the above lab, we have the 192.168.1.0 network and the 192.168.2.0 network are our main ones. We can imagine the 192.168.1.0 network as our end devices. The 192.168.2.0 network as our internal server area. The 200.2.2.0 and 200.3.3.0 networks are just simulating an ISP.
Once all the IP addresses are set up and ports brought online, in Packet Tracer, the link lights go green and one could be fooled into thinking ‘Wow, everything is green; we can throw some pings around and everything will be sweet!’ But that is not so.
At this point, the PCs could ping R1, the local server could ping R2, and the two routers could ping each other. However, the 192.168.1.10 PC could not ping the 192.168.2.10 server. The packets will be dropped at the PC’s default gateway (i.e., R1). This is because routing has not actually been set up yet.
We could enable static routing on both routers as follows:
- We tell R1 that to access the 192.168.2.0 network, it needs to go through R2 (192.168.50.2)
Router1(config)# ip route 192.168.2.0 255.255.255.0 192.168.50.2
- We tell R2 that to access the 192.168.1.0 network, it needs to go through R1 (192.168.50.1)
Router2(config)# ip route 192.168.1.0 255.255.255.0 192.168.50.1
Once these are both configured, either of the PCs could access the server and vice versa. If only one was configured, then traffic could only flow one way.
This is great for such a small network, but dynamic routing is necessary once networks expand beyond a simple two-router setup like this.
Also of note is the default route. This is set up so the router knows where to send traffic when it doesn’t know about the network the traffic is destined for. More aptly named, the gateway of last resort is used when all else fails. Rather than dropping packets, traffic gets sent out that way. Typically, you would set it so that your router connected to the internet has the ISP network listed as the gateway of last resort. Any traffic bound for an IP address not on the local network will get sent out that interface and off to the ISP. On R1 in our lab, it has a gateway of last resort set as 200.2.2.1; the command is as follows:
Router1(config)# ip route 0.0.0.0 0.0.0.0 200.2.2.1
EIGRP
Let us tear out the static routes by issuing the exact commands above but with a ’no’ in front of them and try a basic dynamic routing setup. We will be doing a basic EIGRP setup here, so rather than telling the routers how to access the other networks, we will be telling them to use EIGRP, what networks to advertise and/or look for neighbor routers it can communicate with. The neighbor routers will form a relationship, advertise their networks with each other, and automatically learn how to route between all those networks.
First, go into config mode and enter:
Router1(config)# router eigrp 1
The 1 stands for the group; you can choose any group number, but you need to make sure all the neighbors you want to form are on the same group. This will put us in a different mode: EIGRP config mode, and the terminal will change to (config-router). Now we have to issue the network command for all the networks we want to advertise or form connections on. For the above lab, we will have the following:
Router1(config)# router eigrp 1
Router1(config-router)# network 192.168.1.0 0.0.0.255
Router1(config-router)# network 192.168.50.0 0.0.0.3
Router2(config)# router eigrp 1
Router2(config-router)# network 192.168.2.0 0.0.0.255
Router2(config-router)# network 192.168.50.0 0.0.0.3
A note on the backward-looking subnet masks in these commands. These are wildcard masks. It is the reverse of the subnet mask. Instead of telling the command which network bits to consider with the subnet mask, we are telling it which host bits to consider with the wildcard mask. More about that at another time.
Now, without setting up static routes, PC1 will be able to ping the local server.